

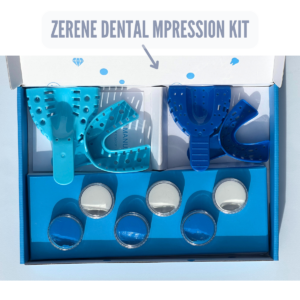
Zerene Impression Kit
The First Steps Toward Better Jaw Health & Sleep!
Follow the steps below to complete your dental impression kit:
-
STEP 1 - DOWNLOAD THE ZERENE APP


-
STEP 2 - CREATE YOUR ZERENE ACCOUNT
Follow app instructions to set up account. Note: this will include giving us your address (possibly for a second time) so that we can be sure to ship your custom Zerene to the right place.

-
STEP 3 - COMPLETE YOUR DENTAL IMPRESSION KIT
Follow written instructions included in the kit, or written or video instructions included below.
-
STEP 4 - SUBMIT PHOTOS OF YOUR DENTAL IMPRESSIONS
Follow app instructions to submit photos of your dental impressions for approval – instructions in the app will guide you! NOTE: MAKE SURE THE GUMLINE IS VISIBLE ON YOUR IMPRESSION WHEN YOU TAKE THE PHOTOS
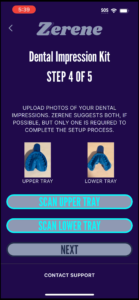
-
STEP 5 - WAIT FOR ZCOACH APPROVAL
Your ZCoach will check your dental impression photos to ensure that all is well – this step helps us get you your Zerene faster!

-
STEP 6 - SHIP YOUR IMPRESSIONS TO ZERENE
Pack your impressions in the provided envelope and drop them into the mail – no need to pay for shipping or wait in long lines!

-
STEP 7 - GET EXCITED - YOUR CUSTOMIZED ZERENE WILL ARRIVE SOON!
While you wait you can fill out your sleep profile, check out the Zerene Blog which offers good insights into how to get great results, and prepare yourself for an exciting transformation!


Impression Kit Instructions
WARNINGS
NOTE: You may make an upper impression, lower impression or both. Do NOT take the impression if you have issues noted below. You may still take it on the unaffected side.
Example: Adrian has a permanent retainer on their lower teeth. They will not make an impression on their lower teeth. They can still make an impression with their upper teeth and use Zerene.
Do not take an impression:
- If you have loose teeth or teeth that can wiggle.
- If you have severe pain in teeth.
- If you have dental implants, or wear dentures, braces or other dental appliances.
- Cavities that have no fillings, or loose fillings or caps.

STEP 1: Brush and floss your teeth


NOTE: It’s helpful to prepare the correct impression tray for use at this time. You will use the upper impression tray first.
 Place the impression tray options in your mouth. Select the tray that accommodates your teeth and is able to wiggle more (this means that the impression silicone will be able to reach all parts around your teeth when molded).
STEP 2: TIME SENSITIVE Mix one blue and one white putty together with your hands until uniform in color.

STEP 3: TIME SENSITIVE Roll putty into a snake and press into Upper Teeth Tray

STEP 4: TIME SENSITIVE Put Tray into mouth, and press upper teeth into putty up to at least the gum line

STEP 5: Keep Tray in mouth for 5 minutes. Remove Tray from mouth. Rinse with water.

STEP 6: Take a top-down photo of your impression, and submit it via Zerene app for ZCoach to review.
NOTE: MAKE SURE THE GUMLINE IS VISIBLE ON YOUR IMPRESSION WHEN YOU TAKE THE PHOTOS

STEP 7: Repeat these steps to create an impression of your LOWER teeth
NOTE: MAKE SURE THE GUMLINE IS VISIBLE ON YOUR IMPRESSION WHEN YOU TAKE THE PHOTOS

STEP 8: Until approved place inside the return envelope for safekeeping - but please do not seal it.
